Lab syllabus SYLLABUS FOR 3rd Year B. Pharm. SEMESTER-V

3rd Year B. Pharm Organic Chemistry Lab II

Course Objectives
1. To introduce the learner to the basic techniques of separation of compound mixtures.
2. To introduce the learner to the procedure for identification of organic compounds
3. To introduce the learner to the methods for recrystallization of compounds
Course Outcomes
The learner will be able to:
1. To carry out the separation of simple compound mixtures.
2. To identify organic compounds based on simple tests
3. To recrystallize compounds use single solvent and binary solvent mixtures
List of Experiments:
1) Separation and quantification of binary mixtures by physical and chemical methods.
Identification of one component and confirmation by preparation of a suitable derivative.
Minimum eight binary mixtures, covering a wide variety of types to be studied
2) Theoretical aspects of recrystallization
3) Recrystallization of organic compounds: at least two with the use of different solvents.

3rd Year B. Pharm Pharmaceutics Lab syllabus

To teach the learner the practical aspects of preparation and evaluation of biphasic suspensions and emulsions, semisolid ointments
and creams, suppositories and aerosols formulations for pharmaceutical and cosmetic applications.
Course Outcomes
Upon completion of the course, the learner shall be able to:
1. Understand the formulation aspects of biphasic and semisolid dosage forms
2. Explain calculations involved in formulations
3. Describe the importance of quality evaluation of biphasics, semisolids, suppositories, aerosols
No. Details
Formulation and Preparation of the following:
1 Biphasics: Suspensions and Emulsions
1. Paracetamol Paediatric Oral Suspension IP
2. Dry suspension for reconstitution (any one)
3. Antacid Suspension
5. Liquid Paraffin Emulsion IP
6. White Liniment BPC/ Turpentine Liniment IP
7. Evaluation of any one suspension & one emulsion
Evaluation Parameters: Organoleptic Properties, Particle/droplet size, Sedimentation/Creaming volume ,
pH, stability studies, rheology of any one preparation
2 Semisolids
1. Compound Benzoic acid Ointment IP
2. Aqueous Calamine Cream IP
3. Cetrimide Cream IP
4. Diclofenac Gel BP
Evaluation of any one Ointment / Cream
3 Suppositories
1. Glycerin Suppositories USP
2. Paracetamol Suppositories BP/Indomethacin Suppositories IP /
Bisacodyl suppositories IP/ Aspirin Suppositories USP
Evaluation of any one suppository
4 Pharmaceutical Aerosols
Introduction to different devices for inhalation and demonstration of evaluation of a suitable commercial
product for simple tests related to spray and weight / drug content per discharge
5 Cosmetics: Preparation & Evaluation
1. Toothpaste
2. Clear liquid Shampoo
3. Lipstick/ Nail lacquer
4. Vanishing Cream/Cold cream

3rd Year B. Pharm Experimental Techniques in Microbiology and Biotechnology Lab

Course Objectives
To introduce the learner to some of the common techniques used in microbiological work and biotechnology experiments.
Course Outcomes
1. Characterization and identification of bacteria using various staining techniques (morphological study), colony characterization,
serological and biochemical characteristics
2. Analyze quality of raw material, food and water and assessment of extent of microbial contamination using counting technique
and Evaluate sterility of products.
3. To impart the knowledge of bioassay of antibiotic and test antibiotic sensitivity of few antibiotics.
LIST OF EXPERIMENTS:
1. Study of microscope and common laboratory equipment e.g., B.O.D. incubator, laminar air flow unit, aseptic hood, autoclave,
hot-air sterilizer, deep freezer, refrigerator.
2. Sterilization of glassware and preparation and sterilization of nutrient broth, agar slants, plates and inoculation techniques.
3. Isolation of pure culture by T plate, pour plate and streak plate methods. Colony characterization and growth patterns in broth,
slant.
4. Study various staining techniques such as Gram Staining, Spore, Negative staining, Cell wall staining, Capsule,
Motility by hanging drop technique.
5. Bacteriological analysis of water (IMVIC and MPN)
6. Test for sterility as per IP (Injection water/ nonabsorbent cotton/soluble powder/ear drops).
7. Antimicrobial assay of antibiotic using cup plate method, introduction to zone of inhibition and calculation.
8. Study drug resistance using antibiotic sensitivity testing
9. Biochemical tests (Catalase, Oxidase, Urease, Nitratase, Protease, Gelatinase, Phosphatase, Amylase).
10. Demonstration experiments
a. Thermal death time and thermal death point.
b. Effect of Ultra-Violet exposure on growth of E. coli.
c. Selection and isolation of bacteria by replica plating.
d. Widal test
e. Counting of bacteria by total count, viable count, and biomass determination method


Line Clearance before Operation of Pharmaceutical Manufacturing Area Friabilator PPT PDF

Line Clearance before Operation of Pharmaceutical Manufacturing Area Friabilator PPT PDF

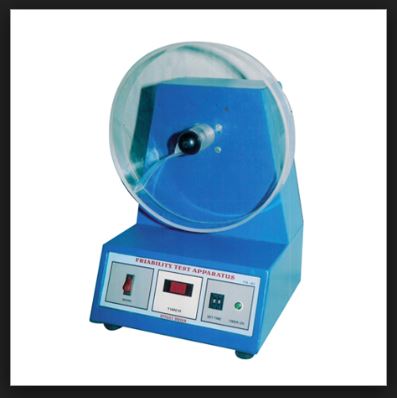
Here we see Line Clearance before Operation of Pharmaceutical Manufacturing Area Friabilator.

What is Friability Testing?

To determine the physical strength of uncoated tablets on exposure to mechanical pressure, Friability test is done. The test can find out the extent of mechanical stress withstandable by the tablets during their manufacturing, distribution and handling processes. Friability testing is an accepted operation across the pharmaceutical industry, and the instrument used to perform this process is called Friabilator or Friability Tester.

Line Clearance before Operation of Pharmaceutical Manufacturing Area Friabilator PPT PDF

PROCEDURE FOR OPERATION AND CLEANING FRIABILATOR

Tablet friability measures the efficiency of friabilator or indicates the formulation suitability along with routine QC functions or measures “dusting”. For a specified period of time, tablets are rotated in a plastic drum. To quantify the amount of surface material that has worn off, a gravimetric determination is made.

The responsibility and the accountability are generally of the Executive Manufacturing, Executive QA and Assistant Manager QA.


CLEANING FRIABILATOR

:

  • By pressing the button to remove the knob on the shaft.
  • Pull the outward drum from the shaft carefully. Similarly, remove the inside drum by pulling it outside.
  • By pulling outside remove the detachable disc from both the drums.
  • Clean both the drums with a clean cloth.
  • Remove both the trays. Clean the trays with a clean cloth.
  • After cleaning, put the drums and trays back on its position.

 Line Clearance before Operation of Pharmaceutical Manufacturing Area Friabilator

CORRECT OPERATION:

  • Check cleanliness of the equipment before switching ON.
  • The drum will initialize itself to the loading position; the display will show START.
  • Record the weight of the tablets.

For each tablet weighing up to 0.650 g, take 20 tablets.

For each tablet weighing above 0.650 g, take 10 tablets.

  • Adjust the counts to 100 by pressing the COUNT Key followed by ‘1’, ‘0’, ‘0’ keys. (Count range 1 to 99999).
  • Confirm the reading by pressing ENTER. To see and confirm the number of counts press COUNT Key. Then press RUN/HALT key to start, check the elapsed count. (Test can be performed by adjusting ‘TIME’ similarly as ‘COUNT’.)
  • The test terminates with an audible beep and displaying END and the drum rotates in reverse direction discharging the tablets in the tray.
  • On removing the trays tablets de- dust and weigh the tablets, note down the weight of the tablets.
  • Calculate the percentage loss in the weight by using the formula

(Percentage Loss =Initial Wt – Final Wt/Initial Wt X 100)


Conclusion

On completion of the procedure, the samples are moved, wiped-off dust and weighted again. The difference between the weight before and after the test is the Friability and should not exceed 1 %( ideal percentage). In some cases, where the diameter of tablets is greater than 13mm, such tablets are tested on drums at 10° tilt.

Precautions:

  • Do not hold the drums while rotating.
  • After testing, destroy the tablets.

Validation Protocol & Report Format + Types PDF PPT

Types of process validation

Process validation principle incorporates the understanding that the following conditions exist:

• Quality, safety, and efficacy are designed or built into the product.
• Quality cannot be adequately assured merely by in-process and finished-product
inspection or testing.

Here are the details of Validation Protocol & Report Format + Types PDF PPT . Analytical validation seeks to demonstrate that the analytical methods yield results which permit an objective evaluation of the quality of the pharmaceutical product as specified. The person responsible for the quality control laboratory should ensure that test methods are validated. The analytical devices used for these tests should be qualified and the measuring instruments used for the qualification should be calibrated. Each new test procedure should be validated.

Process validation is defined as the collection and evaluation of data, from the process design stage through commercial production, which establishes scientific evidence that a process is capable of consistently delivering quality product. Process validation involves a series of activities taking place over the lifecycle of the product and process. This guidance describes process validation activities in three stages.
• Stage 1 – Process Design: The commercial manufacturing process is defined during this stage based on knowledge gained through development and scale-up activities.
• Stage 2 – Process Qualification: During this stage, the process design is evaluated to determine if the process is capable of reproducible commercial manufacturing.
• Stage 3 – Continued Process Verification: Ongoing assurance is gained during routine production that the process remains in a state of control.

Validation Protocol & Report Format + Types PDF PPT Pharma

Do you know How To Write a Validation Protocol & Report?

A suggested scheme for Validation protocol and report concerning any particular process in pharmaceutics is here:

Steps for writing Validation protocol and report:

Part 1. Purpose (the validation) and prerequisites
Part 2. Presentation of the entire process and subprocesses, flow diagram, critical steps/risks
Part 3. Validation protocol, approval
Part 4. Installation qualification, drawings
Part 5. Qualification protocol/report

5.1 Subprocess 1

5.1.1 Purpose

5.1.2 Methods/procedures

list of manufacturing methods, SOPs, and written procedures, as applicable

5.1.3 Sampling and testing procedures

Acceptance criteria (detailed description of, or reference to, established procedures, as described in pharmacopoeias)

5.1.4 Reporting

5.1.4.1 Calibration

Calibration of test equipment used in the production process

5.1.4.2 Test data (raw data)

5.1.4.3 Results (summary)
5.1.5 Approval and requalification procedure
5.2 Subprocess 2 (same as for Subprocess 1)

5.n Subprocess 

Part 6. Product characteristics, test data from validation batches

Part 7. Evaluation

Evaluation including comparison with the acceptance criteria and recommendations (including frequency of revalidation/requalification)

Part 8. Certification (approval)

Part 9.Abbreviated version of the validation report

If applicable, preparation of an abbreviated version of the validation report for external use, for example by the regulatory authority

The validation protocol and report may also include copies of the product stability report or a summary of it, validation documentation on cleaning, and analytical methods.

Types of process validation:

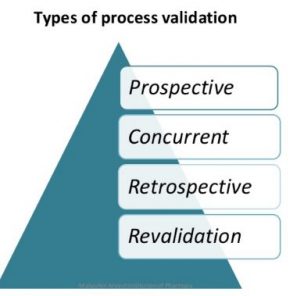
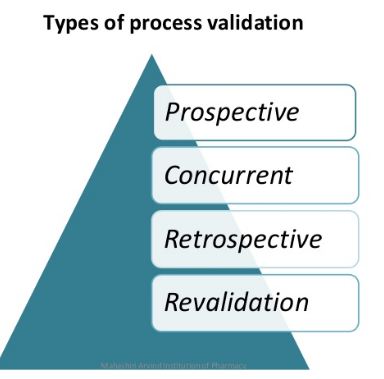
Depending on when it is performed in relation to production, validation can be prospective, concurrent, retrospective or revalidation (repeated validation).

  1. prospective
  2. concurrent
  3. retrospective
  4. revalidation 

Types of process validation

Type 1 – Prospective validation

Prospective validation is carried out during the development stage by means of a risk analysis of the production process, which is broken down into individual steps: these are then evaluated on the basis of past experience to determine whether they might lead to critical situations.

Where possible critical situations are identified, the risk is evaluated, the potential causes are investigated and assessed for probability and extent, the trial plans are drawn up, and the priorities set. The trials are then performed and evaluated, and an overall assessment is made. If, at the end, the results are acceptable, the process is satisfactory. Unsatisfactory processes must be modified and improved until a validation exercise proves them to be satisfactory. This form of validation is essential in order to limit the risk of errors occurring on the production scale, e.g. in the preparation of injectable products.

Type 2 -Concurrent validation

Concurrent validation is carried out during normal production. This method is effective only if the development stage has resulted in a proper understanding of the fundamentals of the process. The first three production-scale batches must be monitored as comprehensively as possible.1The nature and specifications of subsequent in-process and final tests are based on the evaluation of the results of such monitoring.

1 This careful monitoring of the first three production batches is sometimes regarded as prospective validation.
Concurrent validation together with a trend analysis including stability should be carried out to an appropriate extent throughout the life of the product.

Process validation template Types format PDF

Type 3 -Retrospective validation

Retrospective validation involves the examination of past experience of production on the assumption that composition, procedures, and equipment remain unchanged; such experience and the results of in-process and final control tests are then evaluated. Recorded difficulties and failures in production are analysed to determine the limits of process parameters. A trend analysis may be conducted to determine the extent to which the process parameters are within the permissible range.

Retrospective validation is obviously not a quality assurance measure in itself, and should never be applied to new processes or products. It may be considered in special circumstances only, e.g. when validation requirements are first introduced in a company. Retrospective validation may then be useful in establishing the priorities for the validation programme. If the results of a retrospective validation are positive, this indicates that the process is not in need of immediate attention and may be validated in accordance with the normal schedule. For tablets which have been compressed under individual pressure-sensitive cells, and with qualified equipment, retrospective validation is the most comprehensive test of the overall manufacturing process of this dosage form. On the other hand, it should not be applied in the manufacture of sterile products.

Type 4 -Revalidation

Revalidation is needed to ensure that changes in the process and/or in the process environment, whether intentional or unintentional, do not adversely affect process characteristics and product quality.

Revalidation may be divided into two broad categories:

• Revalidation after any change having a bearing on product quality.
• Periodic revalidation carried out at scheduled intervals.
Revalidation after changes. Revalidation must be performed on introduction of any changes affecting a manufacturing and/or standard procedure having a bearing on the established product performance characteristics. Such changes may include those in starting material, packaging material, manufacturing processes, equipment, in-process controls, manufacturing areas, or support systems (water, steam, etc.). Every such change requested should be reviewed by a qualified validation group, which will decide whether it is significant enough to justify revalidation and, if so, its extent.

Re-validation after changes may be based on the performance of the same tests and activities as those used during the original validation, including tests on sub-processes and on the equipment concerned. Some typical changes which require revalidation include the following:

• Changes in the starting material(s). Changes in the physical properties, such as density, viscosity, particle size distribution, and crystal type and modification, of the active ingredients or excipients may affect the mechanical properties of the material; as a consequence, they may adversely affect the process or the product.

• Changes in the packaging material, e.g. replacing plastics by glass, may require changes in the packaging procedure and therefore affect product stability.

• Changes in the process, e.g. changes in mixing time, drying temperature and cooling regime, may affect subsequent process steps and product quality.

Process validation template Types format PPT Power Point

• Changes in equipment, including measuring instruments, may affect both the process and the product; repair and maintenance work, such as the replacement of major equipment components, may affect the process.

• Changes in the production area and support system, e.g. the rearrangement of manufacturing areas and/or support systems, may result in changes in the process. The repair and maintenance of support systems, such as ventilation, may change the environmental conditions and, as a consequence, revalidation/requalification may be necessary, mainly in the manufacture of sterile products.

• Unexpected changes and deviations may be observed during self-inspection or audit, or during the continuous trend analysis of process data.
Periodic revalidation. It is well known that process changes may occur gradually even if experienced operators work correctly according to established methods. Similarly, equipment wear may also cause gradual changes. Consequently, revalidation at scheduled times is advisable even if no changes have been deliberately made.

The decision to introduce periodic revalidation should be based essentially on a review of historical data, i.e. data generated during in-process and finished product testing after the latest validation, aimed at verifying that the process is under control. During the review of such historical data, any trend in the data collected should be evaluated.

In some processes, such as sterilization, additional process testing is required to complement the historical data. The degree of testing required will be apparent from the original validation.

Read more about Process Validation

Additionally, the following points should be checked at the time of a scheduled revalidation:

• Have any changes in master formula and methods, batch size, etc., occurred? If so, has their impact on the product been assessed?

• Have calibrations been made in accordance with the established programme and time schedule?

• Has preventive maintenance been performed in accordance with the programme and time schedule?

• Have the standard operating procedures (SOPs) been properly updated?

• Have the SOPs been implemented?

• Have the cleaning and hygiene programmes been carried out?

• Have any changes been made in the analytical control methods?

[LAB] Preparation and Standardisation of 0.1N ceric ammonium sulphate

Preparation and Standardisation of 0.1N ceric ammonium sulphate

Aim

To prepare and standardise 0.1 N Ceric Ammonium Sulphate

Chemical Requirements

  1. Ceric Ammonium sulphate
  2. Sulphuric acid
  3. Arsenic Trioxide
  4. Sodium hydroxide
  5. dil Sulphuric acid
  6. Osmic acid
  7. Ferroin sulphate (or) N-Phenyl anthranilic acid

Apparatus

  1. Burette
  2. Conical flask
  3. Measuring Jar
  4. Volumetric Flask
  5. Glass rod

Procedure:

Preparation of 0.1N ceric ammonium sulphate

  1. 66gm of ceric ammonium sulphate was dissolved with gentle heat in a mixture of 30 ml of sulphuric acid and 500 ml of water
  2. The mixture was cooled and filtered
  3. The resulting solution was diluted to 1000ml with water

Standardisation of 0.1 N Ceric Ammonium Sulphate

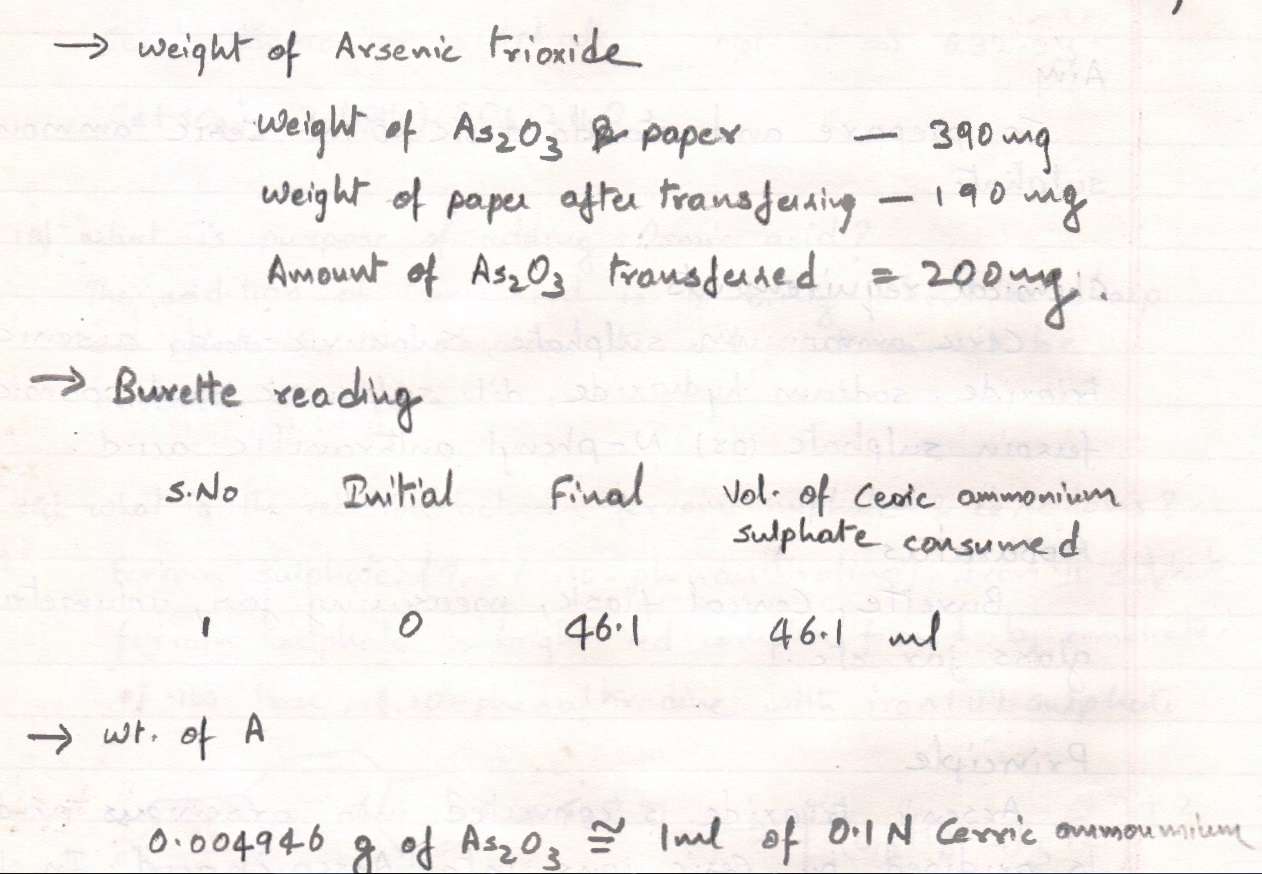
  1. About 0.2 gm of Arsenic trioxide which was previously dried for about an hour was accurately weighed and transferred into a 500 ml conical flask.
  2. The inner walls of the flask were washed with 100 ml of water and mixed thoroughly
  3. Then 300 ml of dil. sulphuric acid , 0.15 ml of osmic acid, 0.1 ml of ferroin sulphate indicator were added
  4. Titration was carried out until pink colour of solution changed to pale blue or yellowish green colour

Each ml of 0.1 N ceric ammonium sulphate ~ 0.6326 gm of ceric ammonium sulphate ~ 4.946 grams of arsenic trioxide

[like-gate]
[/like-gate]

To view calculations, viva questions and principle involved click here


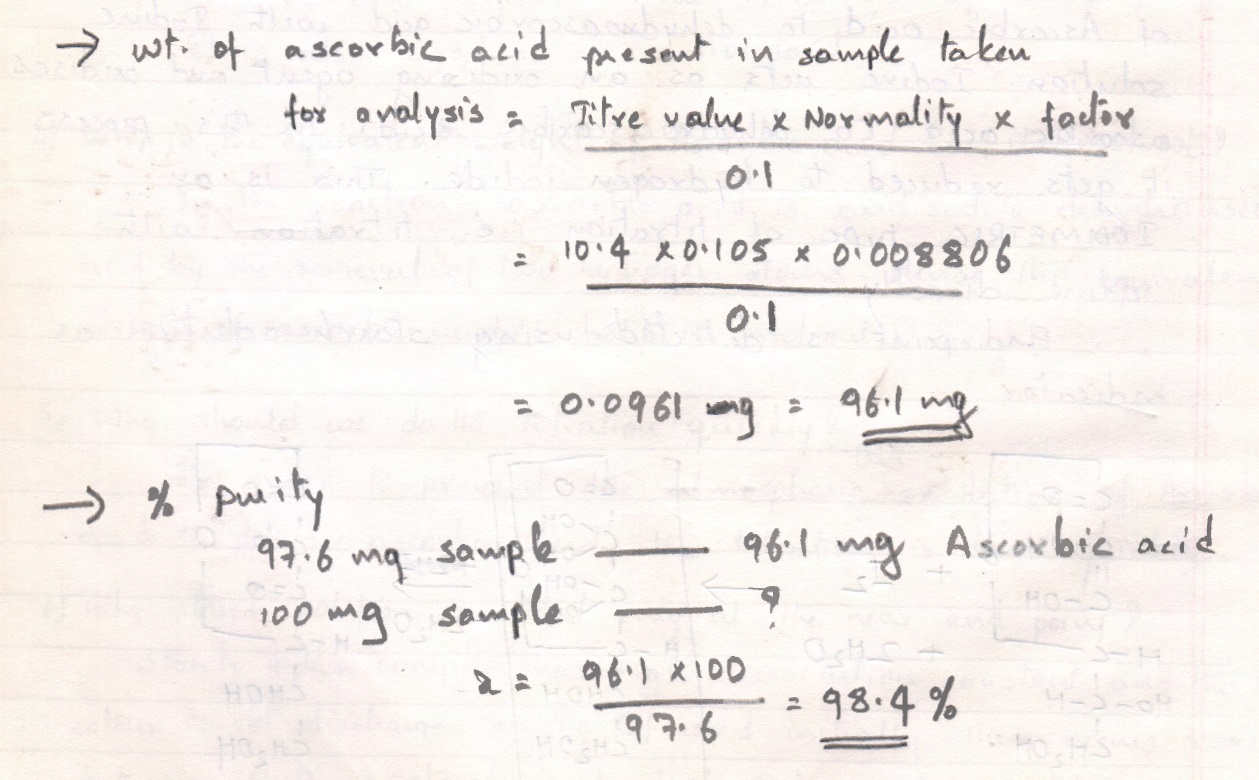
[LAB] Assay of Ascorbic acid with Calculations

Assay of Ascorbic Acid with Calculations

Aim:

To carry out assay of Ascorbic Acid.

Chemical requirements:

  • Ascorbic acid
  • Dil Sulphuric acid
  • Starch solution (Indicator)
  • 0.1 N Iodine Solution

Apparatus

  1. Burette
  2. Conical flask
  3. Beaker
  4. Glassrod
  5. Measuring cylinder

Procedure

  1. Weigh about 0.1 gram of ascorbic acid accurately.
  2. Dissolve in a mixture of 100 ml of freshly boiled and cooled water and 25 ml of dil. sulphuric acid
  3. Tirate immediately with 0.1 N Iodine solution using starch as indicator as the endpoint is clear blue colour

Each ml of 0.1N Iodine solution ~ 0.008806 grams of Ascorbic acid (C6H8O4)

[like-gate][/like-gate]

To view calculations and viva part of Assay of Ascorbic acid click here

[button url=”http://pharmawiki.in/wp-content/uploads/2014/01/Assay-of-Ascorbic-Acid-with-Calculations.pdf” style=”glass” background=”#1782f9″ color=”#ffffff” size=”4″ center=”yes” icon=”icon: download”]Download PDF here[/button]

To view calculations part of Preparation and Standardisation of 0.1N Iodine Solution click here

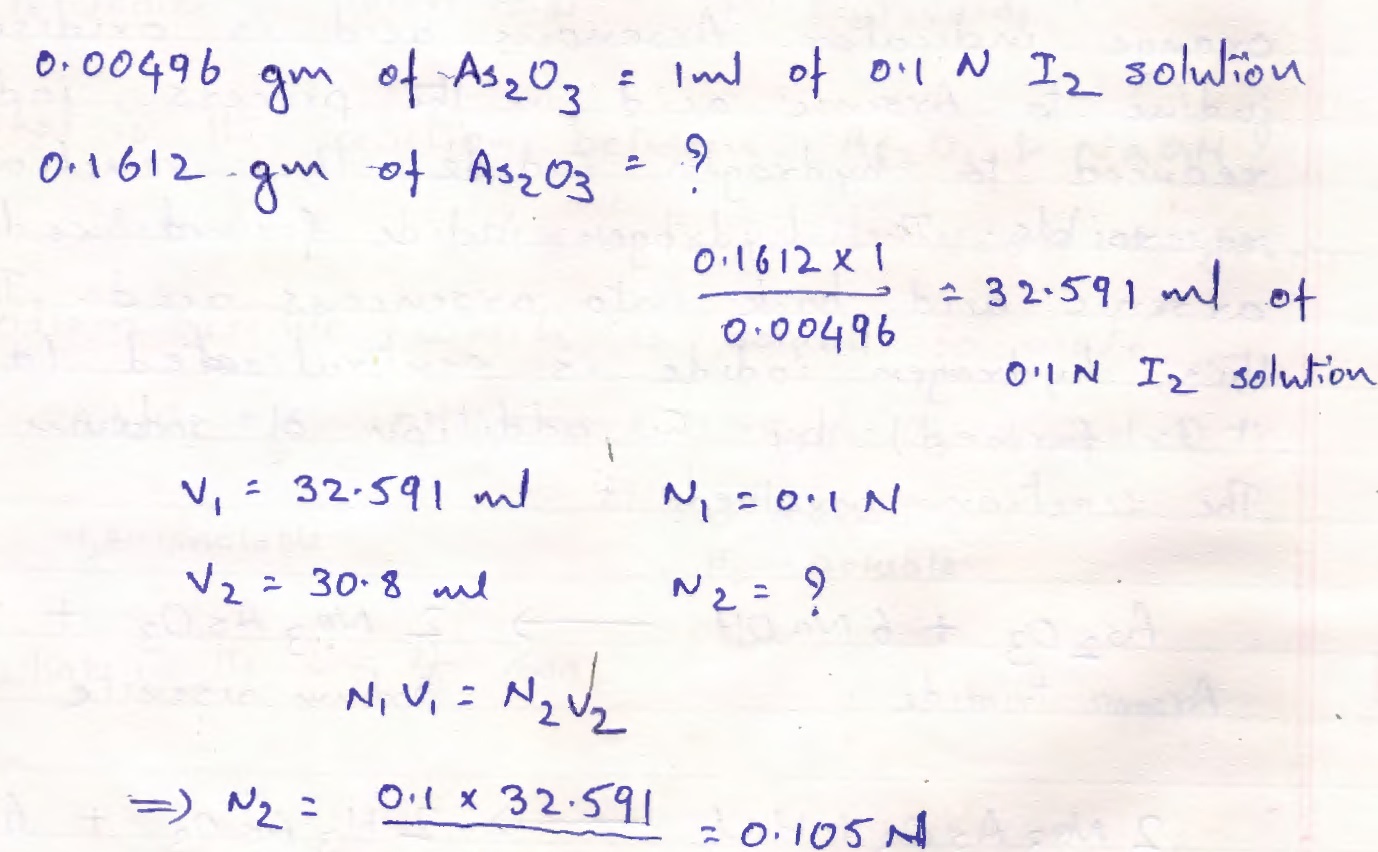
[LAB] Preparation and Standardisation of 0.1N Iodine Solution – Lab Record

Preparation and Standardisation of 0.1 N Iodine solution

Aim:

To preapare and standardize 0.1 N Iodine Solution

Chemical requirements:

  • Iodine
  • Potassium Iodide
  • Dil HCL
  • Arsenic Trioxide (As2O3)
  • Methyl orange (Indicator)
  • Starch solution (Indicator)
  • Sodium hydroxide

Apparatus

  1. Burette
  2. Pipette
  3. Conical flask
  4. Beaker
  5. Glassrod
  6. Mortar& pestle
  7. Measuring cylinder

Procedure

  1. Dissolve 36 grams of potassium iodide in 100ml of water.
  2. Dissolve 14 grams of Iodine in the above solution
  3. Add 3 drops of dilute HCl
  4. Finally make upto 1000 ml with water

Standardisation of 0.1 N Iodine solution

  1. Weigh about 0.15 gn of arsenic trioxide which was previously dried at 1050C for 1 hour
  2. Dissolve in 20ml of 1 N sodium hydroxide solution by warming if necessary
  3. Dilute with 40 ml of water and 2 drops of methyl orange solution was added
  4. Dil.HCl was added drop by drop until the yellow colour is changed to pink; then add 2grams of sodium carbonate, dilute with 50 ml of water and add 3 ml of starch solution

Titrate with 0.1 N Iodine solution taken in burette until a permanent blue colour of starch is produced

Each ml of 0.1 N Iodine solution ≡ 0.00496 grams of Arsenic Trioxide

To view calculations part of Preparation and Standardisation of 0.1N Iodine Solution click here[like-gate]
[/like-gate]

[button url=”http://pharmawiki.in/wp-content/uploads/2014/01/Preparation-and-Standardisation-of-0.1-N-Iodine-solution.pdf” style=”glass” background=”#1782f9″ color=”#ffffff” size=”4″ center=”yes” icon=”icon: download”]Download PDF here[/button]